Convert HTML and CSS to SVG
You can convert HTML and CSS to SVG directly in a browser. With JavaScript. And JSX.
The developers of Next.js created this neat library called Satori, which allows to convert JSX elements with style properties into SVG. As a result, this gives amazing possibilities:
- You can generate HTML previews. For example, you can generate a simple JSX element on the server, convert to SVG, and then later convert it to JPG or PNG to be used as a post preview.
- Whole components (generated SVGs) can be used as background images.
- Convert complicated typography to SVGs and inline them instead of loading the font.
- Generate smaller SVGs to be used here and there in your design or layout.
- Generate solid or gradient backgrounds with borders or other stylistic additions.
- Generate SVG with another SVG inside.
Getting started.
Let's go to Satori's Playground to see how it works.
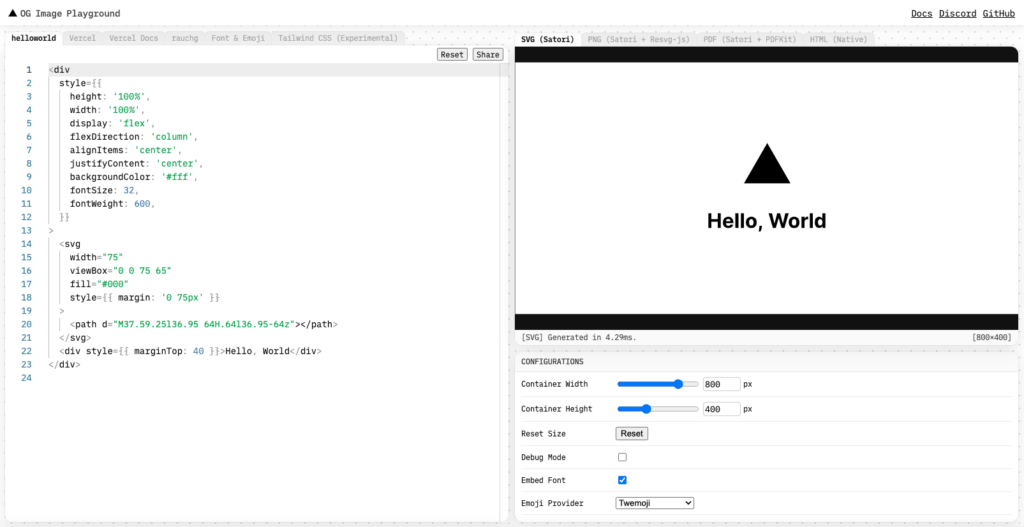
You will notice the React-like syntax with inline style properties and no classNames. That's essential to make it work. However, if you take a look at the last tab, you will also notice that it's possible to use classes to some extent. That is made possible by utilizing the twrnc package, which provides us a tagged template function, which unwraps whatever classnames we provide in the tw template function. For example,
tw`my-1 bg-blue-100`;
// -> { marginTop: 4, marginBottom: 4, backgroundColor: 'rgba(219, 234, 254, 1)' }
Installation.
To ease the development, you will need a React setup. You can refer to Building a Preact application into a standalone script with Rollup on how to prepare the configuration for Rollup (you can adapt it for React by removing the alias() plugin call, and changing the destination format to cjs). After that, you should be able to import satori just like any other package:
import satori from 'satori'

const svg = await satori(
  <div style={{ color: 'black' }}>hello, world</div>,
  {
    width: 600,
    height: 400,
    fonts: [
      {
        name: 'Roboto',
        data: robotoArrayBuffer,
        weight: 400,
        style: 'normal',
      },
    ],
  },
)
Loading the fonts.
You will note the usage of a mysterious robotoArrayBuffer. This should be an arrayBuffer representation of the font (essentially, just a binary Uint8Array content of the TTF, OTF or WOFF font, WOFF2 fonts are not supported at the moment of writing). For Rollup, you will need to use any arraybuffer loader, for example @wemap/rollup-plugin-arraybuffer.
Import it to the rollup.config.js, and add it to the list of plugins,
import arraybuffer from '@wemap/rollup-plugin-arraybuffer';

...
plugins: [
   ...
   arraybuffer({
      include: '**/*.ttf'
   }),
   ...
This will make sure anything you import to JSX that looks like .ttf will get converted into Uint8Array. And here is the final component for our test:
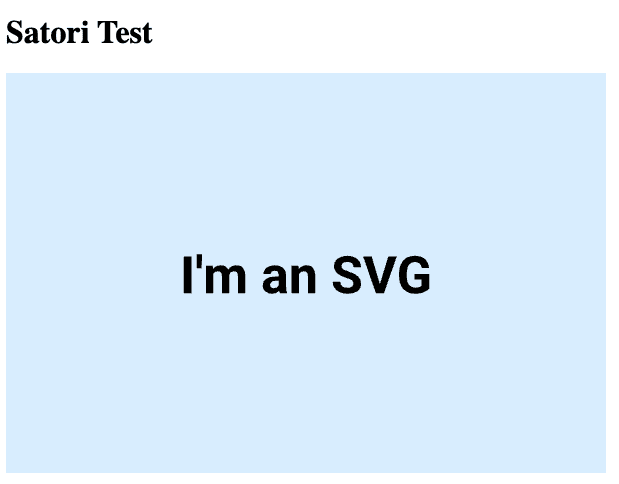
import React, { Component } from 'react';
import satori from 'satori';

import roboto400 from '../fonts/roboto-v30-latin_cyrillic-ext-regular.ttf';
import roboto700 from '../fonts/roboto-v30-latin_cyrillic-ext-700.ttf';

class App extends Component {
    state = {
        html: ''
    };

    componentDidMount() {

        satori(
            <div style={{
                height: '100%',
                width: '100%',
                display: 'flex',
                flexDirection: 'column',
                alignItems: 'center',
                justifyContent: 'center',
                backgroundColor: '#d8edff'
            }}>
                <div style={{ color: 'black', fontSize: 52, fontWeight: 700, textAlign: 'center' }}>I'm an SVG</div>
            </div>,
            {
                width: 600,
                height: 400,
                fonts: [
                    {
                        name: 'Roboto',
                        data: roboto400,
                        weight: 400,
                        style: 'normal',
                    },
                    {
                        name: 'Roboto',
                        data: roboto700,
                        weight: 700,
                        style: 'normal',
                    },
                ],
            },
        ).then((result) => {
            this.setState({
                html: result
            });
        })
    }

    render() {
        return <div>
            <h1>Satori Test</h1>
            <div dangerouslySetInnerHTML={{ __html: this.state.html }}></div>
        </div>
    }
}

export default App;
If everything went as expected, you should be able to see a page that looks merely like this: